.png?alt=media)
Disabled adapters are greyed out and say Disabled
.png?alt=media) , type **`Allow an app through Windows Firewall`**, and select 
1. Windows+R -> **`firewall.cpl`** -> Allow an App through Windows Firewall
2. Select . You might be asked for an administrator password or to confirm your choice.
3. Scroll down to **Spikemark** and **Spikemark\_Pendant\_Port**. 
4. Check any boxes that are blank and select  to save.
**-- if Spikemark is not on the list --**
4. Select  and Browse or enter the path for the app. Select **SpikeMark.exe** and click  then 
1. Default location is **`C:\Program Files\Spikemark`**
5. Return to **Step 3** above to allow Spikemark through.
### Open a port
1. Select the Start menu , type **`Windows Defender Firewall`**, and select 
* Windows+R -> **`firewall.cpl`**
2. Select
, type **`Allow an app through Windows Firewall`**, and select 
1. Windows+R -> **`firewall.cpl`** -> Allow an App through Windows Firewall
2. Select . You might be asked for an administrator password or to confirm your choice.
3. Scroll down to **Spikemark** and **Spikemark\_Pendant\_Port**. 
4. Check any boxes that are blank and select  to save.
**-- if Spikemark is not on the list --**
4. Select  and Browse or enter the path for the app. Select **SpikeMark.exe** and click  then 
1. Default location is **`C:\Program Files\Spikemark`**
5. Return to **Step 3** above to allow Spikemark through.
### Open a port
1. Select the Start menu , type **`Windows Defender Firewall`**, and select 
* Windows+R -> **`firewall.cpl`**
2. Select  on the side navigation menu. You might be asked for an administrator password or to confirm your choice.
3. Select .
4. To open a port, select  and complete the instructions.
1.  then select .png?alt=media)
2. Browse for the path to where you installed Spikemark. If you used the default location, copy this into the window: **`%ProgramFiles%\Spikemark\SpikeMark.exe`** then select .png?alt=media)
3. Select .png?alt=media) then select .png?alt=media)
4. Check all boxes for **When does this rule apply?** then select .png?alt=media)
5. Name the rule **`Spikemark`**  and select 
### Allow UDP in Spikemark
1. Select the Start menu , type **`Windows Defender Firewall`**, and select 
* Windows+R -> **`firewall.cpl`**
2. Select on the side navigation menu. You might be asked for an administrator password or to confirm your choice
3. Select 
4. Scroll to **Spikemark** left click to select it. It wil highlight blue
5. Copy and past the rule using **CTRL+C** then **CTRL+V**
6. Click  in the header **2x** (not double click) to refresh the list
7. Select either Spikemark rule then select  from the right hand Actions menu
8. Select the **Protocols and Ports** menu at the top, then change the **Protocol type:** to **UDP** using the dropdown menu and select  to save
### **Open Port for Spikemark Pendant**
1. Select the Start menu , type **`Windows Defender Firewall`**, and select 
* Windows+R -> **`firewall.cpl`**
2. Select on the side navigation menu. You might be asked for an administrator password or to confirm your choice
3. Select 
4. To open a port, select  and complete the instructions.
1.  then select .png?alt=media)
2. Select  then type **`8080`** into  then select .png?alt=media)
3. Select .png?alt=media) then select .png?alt=media)
4. Check all boxes for **When does this rule apply?** then select .png?alt=media)
5. Name the rule **`Spikemark_Pendant_Port`**  and select 
## Windows Network Adapters
We recommend turning off any network adapters that are not being used by Spikemark to avoid network interference
1. **Windows+R** -> **`ncpa.cpl`**
on the side navigation menu. You might be asked for an administrator password or to confirm your choice.
3. Select .
4. To open a port, select  and complete the instructions.
1.  then select .png?alt=media)
2. Browse for the path to where you installed Spikemark. If you used the default location, copy this into the window: **`%ProgramFiles%\Spikemark\SpikeMark.exe`** then select .png?alt=media)
3. Select .png?alt=media) then select .png?alt=media)
4. Check all boxes for **When does this rule apply?** then select .png?alt=media)
5. Name the rule **`Spikemark`**  and select 
### Allow UDP in Spikemark
1. Select the Start menu , type **`Windows Defender Firewall`**, and select 
* Windows+R -> **`firewall.cpl`**
2. Select on the side navigation menu. You might be asked for an administrator password or to confirm your choice
3. Select 
4. Scroll to **Spikemark** left click to select it. It wil highlight blue
5. Copy and past the rule using **CTRL+C** then **CTRL+V**
6. Click  in the header **2x** (not double click) to refresh the list
7. Select either Spikemark rule then select  from the right hand Actions menu
8. Select the **Protocols and Ports** menu at the top, then change the **Protocol type:** to **UDP** using the dropdown menu and select  to save
### **Open Port for Spikemark Pendant**
1. Select the Start menu , type **`Windows Defender Firewall`**, and select 
* Windows+R -> **`firewall.cpl`**
2. Select on the side navigation menu. You might be asked for an administrator password or to confirm your choice
3. Select 
4. To open a port, select  and complete the instructions.
1.  then select .png?alt=media)
2. Select  then type **`8080`** into  then select .png?alt=media)
3. Select .png?alt=media) then select .png?alt=media)
4. Check all boxes for **When does this rule apply?** then select .png?alt=media)
5. Name the rule **`Spikemark_Pendant_Port`**  and select 
## Windows Network Adapters
We recommend turning off any network adapters that are not being used by Spikemark to avoid network interference
1. **Windows+R** -> **`ncpa.cpl`** 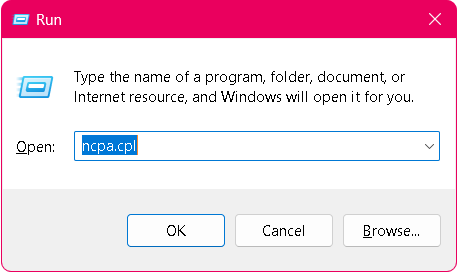 2. **Right click** on each unused network adapter and select 
2. **Right click** on each unused network adapter and select 
Disabled adapters are greyed out and say Disabled