> For the complete documentation index, see [llms.txt](https://docs.creativeconners.com/docs/llms.txt). Markdown versions of documentation pages are available by appending `.md` to page URLs; this page is available as [Markdown](https://docs.creativeconners.com/docs/readme.md).
# Creative Conners Docs
Welcome to our documentation site! If you bump into a broken link, missing image, or just can’t find what you’re looking for please let us know.
| [](/docs/spikemark-6.md) | [](/docs/showstopper.md) |
| :-----------------------------------------------------------------------------------------------------------------------------------------------------------------------------------------------------: | :-----------------------------------------------------------------------------------------------------------------------------------------------------------------------------------------------------: |
| [](/docs/stagehand.md) | [](/docs/machinery.md) |
## CCI Docs Offline
We're still working towards a better solution, but here is how you can save a web page for offline viewing!
{% hint style="warning" %}
Keep in mind that links will not work when viewing a page offline
{% endhint %}
### Apple Mobile Devices
{% tabs %}
{% tab title="Chrome" %}
[As seen from Google Chrome Help:](https://support.google.com/chrome/answer/7343019?hl=en\&co=GENIE.Platform%3DiOS)
### Read pages later & offline
You can save web pages to read later, even if you're offline, like when you're on an airplane or somewhere without an Internet connection. To read pages later offline, download them in Chrome ahead of time.
#### Save a page from Chrome to read later
You need to be online to save a page to your Reading List.
1. On your iPhone or iPad, open the Chrome app .
2. Go to a page you want to save.
3. Tap More   Add to Reading List .
**Save a page from another app**
1. On your iPhone or iPad, open the app.
2. Go to a page you want to save.
3. At the top right, tap Share .
4. If you haven't already, add Chrome to your Share list:
1. In the list of apps, scroll to the end and tap **More**.
2. Switch Chrome on .
3. Tap **Done**.
5. Find and tap Chrome.
6. Tap **Read later**.
You can also tap **Open in Chrome** to open the page in your browser right away.
#### Read a saved page in your Reading List
1. On your iPhone or iPad, open the Chrome app .
2. Tap More   Reading List .
3. Tap the page you want to read.
When you're back online, the live version of the page will load. If you don't see the live version, reload the page.
#### Delete a saved page from your Reading List
1. On your iPhone or iPad, open the Chrome app .
2. Tap More   Reading List .
3. Swipe left on the page you want to delete  tap **Delete**.
{% endtab %}
{% tab title="Safari" %}
[As seen from Apple Support:](https://support.apple.com/en-us/HT200294)
### Add webpages to Reading List
With Reading List, you can save webpages for later. After you add a webpage to your Reading List, you can read it whenever you want, even if you don't have an internet connection.
#### Add a webpage
1. Open a webpage in Safari on your iPhone or iPad.
2. Tap the Share button , then tap Add to Reading List.
{% hint style="info" %}
Safari saves the link and the webpage. You can read the webpage later, even if you're offline. Go to **Settings > Safari**, scroll down to Reading List, and make sure that **Automatically Save Offline** is on.
{% endhint %}
####
***
#### View your Reading List
1. Tap the Show Bookmarks button , then tap the Reading List button .\
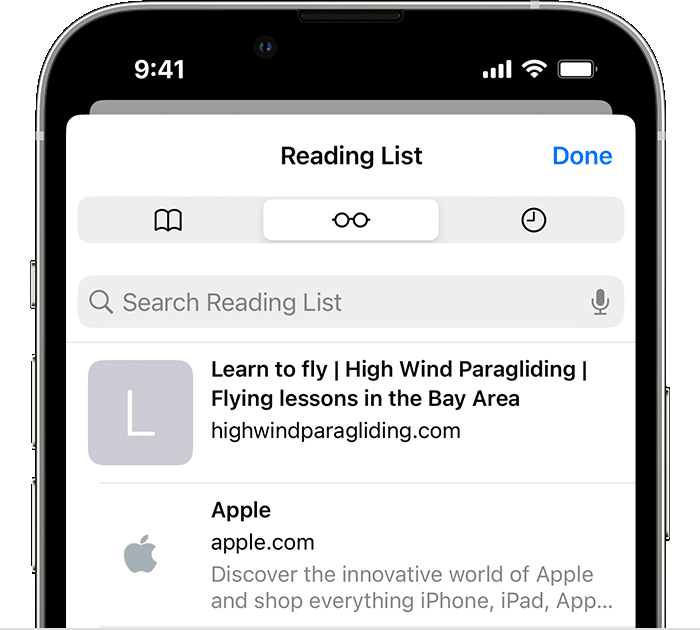
2. Tap the webpage that you want to read.
When you're done, open Reading List again and swipe left to delete the webpage from your Reading List. Or swipe right to mark the page as unread.
{% endtab %}
{% endtabs %}
### Computer
{% tabs %}
{% tab title="Chrome" %}
[As seen from Chrome Chrome Help:](https://support.google.com/chrome/answer/7343019?hl=en\&co=GENIE.Platform%3DDesktop)
### Read pages later & offline
You can save web pages to read later, even if you're offline, like when you're on an airplane or somewhere without an Internet connection. To read pages later offline, download them in Chrome ahead of time.
#### Read a page later
To read a page later, add it to your reading list.
1. On your computer, open Chrome .
2. Go to a page you want to read later.
3. At the top right of your browser, click Side panel .
4. In the panel, select **Reading list**.
5. Click **Add current tab**.
6.
**Tip:** You can also add a tab to your reading list by right-clicking on the tab  **Add to reading list**.
#### Find your reading list
1. At the top right of your browser, click Side panel .
2. Click the Down arrow   **Reading list**.
**Tip:** You can also reorder, edit, and delete items from your reading list from the side panel.
#### Download a page from Chrome to read offline
You must be online to save a page.
1. On your computer, open Chrome.
2. Go to a page you want to save.
3. At the top right, click More   **More Tools**  **Save page as**.
4. Choose where you want to save the page.
5. Click **Save**.
**To read a saved page,** open the file on your computer. It will open in your default browser, like Chrome or Safari.
**To delete a saved page,** delete the file from your computer.
{% endtab %}
{% endtabs %}
---
# Agent Instructions
This documentation is published with GitBook. GitBook is the documentation platform designed so that both humans and AI agents can read, navigate, and reason over technical content effectively. Learn more at gitbook.com.
## Querying This Documentation
If you need additional information that is not directly available in this page, you can query the documentation dynamically by asking a question.
Perform an HTTP GET request on the current page URL with the `ask` query parameter, and the optional `goal` query parameter:
```
GET https://docs.creativeconners.com/docs/readme.md?ask=&goal=
```
`ask` is the immediate question: it should be specific, self-contained, and written in natural language.
`goal` is optional and describes the broader end goal you are ultimately trying to accomplish on behalf of the user. GitBook uses it to tailor the answer towards what is most useful for that goal.
The response will contain a direct answer to the question and relevant excerpts and sources from the documentation.
Use this mechanism when the answer is not explicitly present in the current page, you need clarification or additional context, or you want to retrieve related documentation sections.